Old Laser Cutter: Difference between revisions
Kent.durvin (talk | contribs) m Kent.durvin moved page Laser Cutter to Old Laser Cutter: To allow the new laser the right place in the equipment list |
|||
| (11 intermediate revisions by 5 users not shown) | |||
| Line 1: | Line 1: | ||
[[category:inactiveequipment]][[category:inactive]][[category:back room]] | |||
<span style="color:#00ff00; background:#808080"> | |||
'''We have a new Laser Cutter! check out [[Thunder Laser]] for info''' | |||
</span> | |||
'''Obsolete. For archive only.''' | |||
The Laser Cutter is a 40 watt CO2 laser located in the HackRVA Electronics Lab. It can cut materials such as wood and plastic (but nothing containing chlorine, such as PVC!). We use Mach3 control software. The [[2.x Laser Cutter]] page has details about the laser construction. | The Laser Cutter is a 40 watt CO2 laser located in the HackRVA Electronics Lab. It can cut materials such as wood and plastic (but nothing containing chlorine, such as PVC!). We use Mach3 control software. The [[2.x Laser Cutter]] page has details about the laser construction. | ||
| Line 12: | Line 21: | ||
The laser cuts a path through your material that is approximately '''0.23 mm''' wide if the laser is focused correctly for your material (see Step 11 of the Quick-Start guide that follows). This is similar to the cut made by a saw blade or a router bit. Another name for the width of the cut is the '''kerf'''. Most users don't need to bother about this as the cut-width is too small to have a noticeable effect on your work piece. | The laser cuts a path through your material that is approximately '''0.23 mm''' wide if the laser is focused correctly for your material (see Step 11 of the Quick-Start guide that follows). This is similar to the cut made by a saw blade or a router bit. Another name for the width of the cut is the '''kerf'''. Most users don't need to bother about this as the cut-width is too small to have a noticeable effect on your work piece. | ||
However, if you are cutting very precise (or very small) shapes, you may want to factor in the kerf. Assume that 1/2 of that width (or 0.115 mm) will be removed from each side of your final work piece. You can either 1) enlarge your dimensions to include this amount or 2) use a "profiling" setup in CamBam and select the 0.23mm tool. CamBam will create a | However, if you are cutting very precise (or very small) shapes, you may want to factor in the kerf. Assume that 1/2 of that width (or 0.115 mm) will be removed from each side of your final work piece. You can either 1) enlarge your dimensions to include this amount or 2) use a "profiling" setup in CamBam and select the 0.23mm tool. CamBam will create a toolpath that accounts for the kerf width and maintains your original work piece dimensions. | ||
===Quick-Start guide for the Laser Cutter=== | ===Quick-Start guide for the Laser Cutter=== | ||
| Line 77: | Line 85: | ||
[[File:CamBamInstructions1.PNG]] | [[File:CamBamInstructions1.PNG]] | ||
* Pick all the shapes you want to cut in your drawing | * Pick all the shapes you want to cut in your drawing by highlighting them. | ||
* Once they are selected, click the red/orange "engrave" button to do an engraving machine operation | * Once they are selected, click the red/orange "engrave" button to do an engraving machine operation | ||
| Line 119: | Line 127: | ||
====CamBam and Mach3 Configuration Files==== | ====CamBam and Mach3 Configuration Files==== | ||
Both CamBam and Mach3 require configuration files to work properly with the laser cutter. CamBam uses these configuration files to properly generate gcode designed for the laser cutter. Mach3 uses a configuration file to configure the controls to match the lasers motors, limit switches, power controls, etc. | Both CamBam and Mach3 require configuration files to work properly with the laser cutter. CamBam uses these configuration files to properly generate gcode designed for the laser cutter. Mach3 uses a configuration file to configure the controls to match the lasers motors, limit switches, power controls, etc. | ||
If the configuration files need to be reinstalled, the master copies can be found | If the configuration files need to be reinstalled, the master copies can be found on [https://github.com/AlanFord/laser-cutter github.com] | ||
===Remaining Tasks=== | ===Remaining Tasks=== | ||
Latest revision as of 19:55, 27 November 2020
We have a new Laser Cutter! check out Thunder Laser for info
Obsolete. For archive only.
The Laser Cutter is a 40 watt CO2 laser located in the HackRVA Electronics Lab. It can cut materials such as wood and plastic (but nothing containing chlorine, such as PVC!). We use Mach3 control software. The 2.x Laser Cutter page has details about the laser construction.
Access to the Laser Cutter requires Laser Training from a qualified member.
 wear eye protection
 no incorrect materials with laser (PVC)
Material Sizes and Thicknesses
The maximum cutting area is 19 inches across and 10 inches deep. Smaller work pieces are easier to handle - getting under the cutting head without having to lower the bed a lot. If you are cutting, and not etching, a good material thickness for easy cutting would be 1/8 inch, or 3 mm. A maximum thickness is about 1/4 inch, or 6 mm, and may require multiple passes to cut completely through.
Laser Spot Size / Cut Width
The laser cuts a path through your material that is approximately 0.23 mm wide if the laser is focused correctly for your material (see Step 11 of the Quick-Start guide that follows). This is similar to the cut made by a saw blade or a router bit. Another name for the width of the cut is the kerf. Most users don't need to bother about this as the cut-width is too small to have a noticeable effect on your work piece.
However, if you are cutting very precise (or very small) shapes, you may want to factor in the kerf. Assume that 1/2 of that width (or 0.115 mm) will be removed from each side of your final work piece. You can either 1) enlarge your dimensions to include this amount or 2) use a "profiling" setup in CamBam and select the 0.23mm tool. CamBam will create a toolpath that accounts for the kerf width and maintains your original work piece dimensions.
Quick-Start guide for the Laser Cutter
Step 1: Turn on the computer connected to the laser (computer on first or they won’t talk).
Step 3: Open Mach3 software on the computer.
Step 4: Turn on the Laser Cutter by plugging in the GFI cord (looks like a short, yellow extension cord).
Step 5: Plug in the ventilation fan (fan is on the nearby double-door).
Step 6: "Home" the laser (so it knows where the laser head is).
Step 7: Load your G-Code under “file->load g-code” in the top--bar menu. (See below for more information on generating the g-code for this.)
Step 8: Use “tab” to bring up the virtual pendent (so you can jog/move the machine head)
Step 9: Place your workpiece on the cutting bed, but don't knock into the laser head. Lower the cutting bed if you need more room.
Step 10: Position the tool to your 0,0 point.
Step 11: Raise or Lower the cutting bed such that the top of your workpiece is 70 mm below the top of the laser carriage (the larger moving aluminum plate). An easy way to set the cutting bed height is to use the height gauge, which is the wooden paint stirrer with blue painters tape marking 70 mm. The distance used to be 71 mm, but we made more accurate measurements. Getting this pretty close to 70 mm is important in preventing fires (usually caused by an out-of-focus beam).
Step 12: Zero-out all your coordinates inside Mach3. (the “ref coordinates” button on screen)
Step 13: Set the laser power as needed.
Step 14: Hit “Cycle-Start” button on computer screen in Mach3 to begin cutting routine.
Step 15: Be ready to hit “stop” on screen, especially on first starting, in case something is wrong.
Laser Tips and Safety
Using the Machine:
- Wear safety glasses. Stray laser beams are invisible and can blind you.
- If your work-piece starts flaming, hit the big-red stop button on the front of the laser, then put out the fire. It will very likely go out once the laser is off, but open the lid and remove the workpiece to keep excessive smoke out of the system. In very extreme cases, there is a fire extinguisher, but using it would destroy the laser cutter.
- Don’t put your hands in proximity of the laser head while it’s running. The machine might make a move you’re not expecting.
- Watch the machine while it’s cutting. Be ready to turn it off in case something malfunctions.
- If you have doubts about your G-Code, run the CNC in the air with the big, red Stop Button on the front of the laser pressed in. You can see the laser's path without damaging your work piece.
- Be aware when adjusting the table height. You don’t want the laser nozzle to bang the work piece.
- Wear safety glasses. Stray laser beams are invisible and can blind you. (Yes, it is important enough to repeat.)
Mach3 Software Tips
- If Mach3 isn’t responding, hit the “RESET” button. There’s a good chance it’s flashing at you.
- If you need to start over on g-code, the “rewind” button takes the code to the start. The “Go Home” button takes the spindle to your original starting place.
- There’s a virtual tool-path graphic in the top right corner of the screen. It can give you an idea of what’s going to happen when you hit start.
- You can edit your g-code inside Mach3 if needed. This is a fast way to make adjustments.
- You can increase/decrease the travel speed inside Mach3. If the machine is going too fast, you can slow it down there with the arrows.
G-Code Tips
- Use XXXX to guide you on setting parameters.
- If your workpiece is charring or burning, use a lower power level or a faster feed speed.
- If the laser doesn't cut completely through your workpiece, try multiple passes by running your gcode again. Click "Rewind" and start. Don't touch your workpiece or it won't line up.
Software for Making G-Code
The CNC Mogul Router page has a lot of information about making G-Code. However, the laser needs a few special modifications. The easiest way to get started is to use either CamBam or MakerCam.
CamBam
Start with a DXF file generated by your favorite CAD package.
- Start CamBam and load your DXF file.
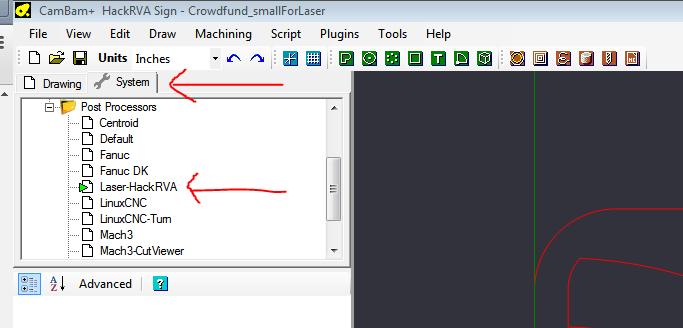
- Select the "System" tab, expand the "Post Processors" drop down folder, then make "Laser-HackRVA" the default post-processor.
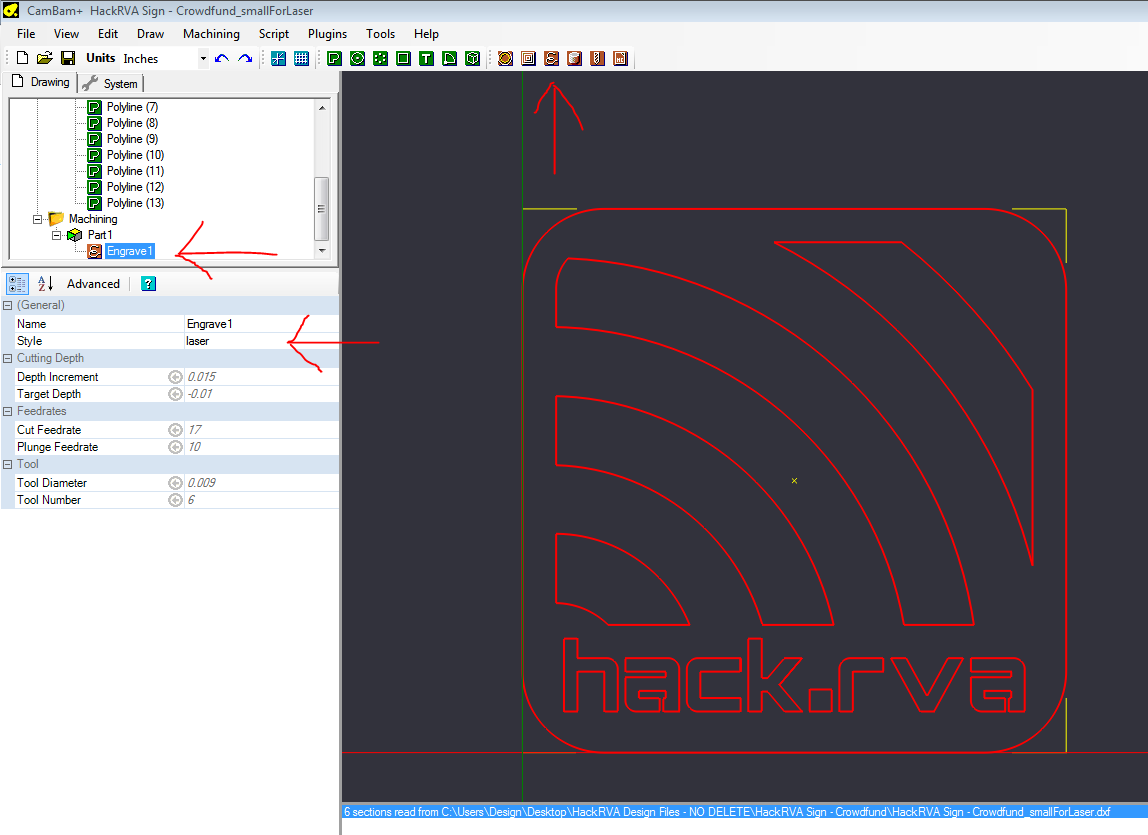
- Pick all the shapes you want to cut in your drawing by highlighting them.
- Once they are selected, click the red/orange "engrave" button to do an engraving machine operation
- Highlight the "Engrave1" machine operation just created in the "Machining" folder on the side-bar view. In the details below, click in the blank area to the right of "Style" paramater under "General" and a drop-down list will appear. Choose "laser" from the list. This is the only setting that needs adjustment, the rest is pre-populated from choosing the "Laser-HackRVA" post-processor in the earlier step.
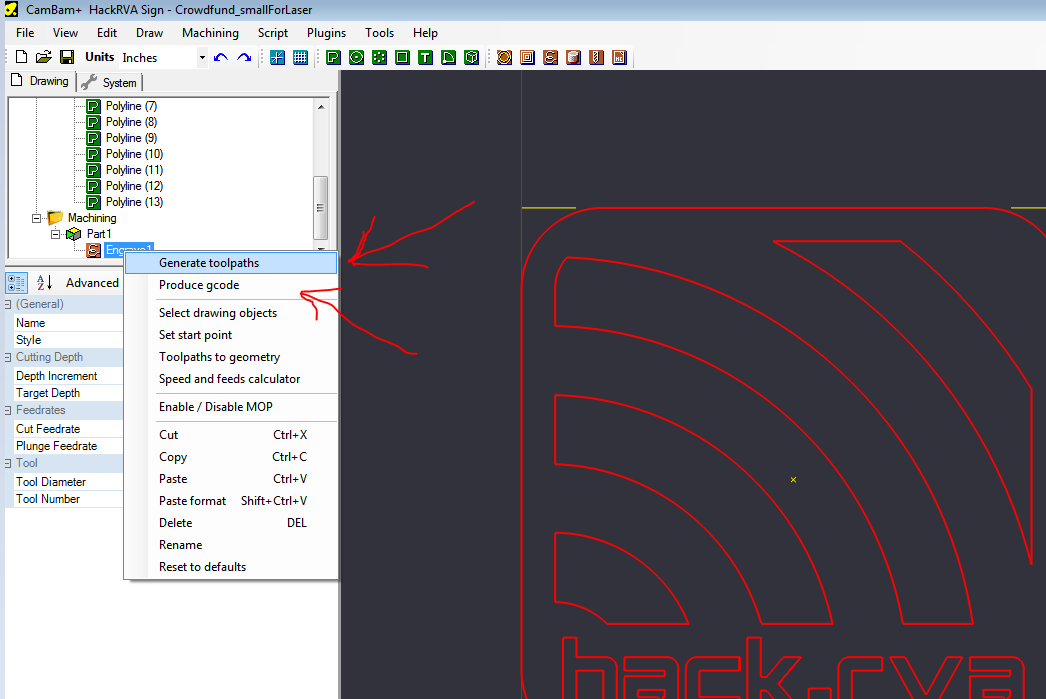
- Now hover over and right-click the "Engrave1" machining operation you've been using, and select "Generate toolpaths". This will create a bunch of lines on top of your lines in the drawing where the laser will cut at.
- Finally do the same thing as in last step, but this time pick "Produce gcode". This will create a file that ends in file extension ".nc" which is the file Mach3 needs to run the laser.
MakerCam.com
MakerCam.com is an in the browser vector drawing program and g-code generator. There is a tutorial and help button on the site.
Make an SVG file using a drawing package like InkScape. Load your SVG file into makercam and use the following settings:
-set z-clearance plane to 0.001 (temp)
-set depth increment to 0.001
-set final depth to 0.001
-set tool diameter to 0.001
-the rest is normal
- Use Laser - MakercamConverter.py on the desktop of the digital design PC. Laser - MakercamConverter.py
Problems
For more help go to https://groups.google.com/forum/#!forum/hackratlasercutter and ask to join.
Additional Information
Feeds and Speeds
Feed or Feed-Rate is how fast your tool moves across the works surface. The power level of the laser is controlled by the aluminum knob on the front, and shown by the analog meter on the front. It is limited to 20mA, but lower is better for the life of the tube. A slower feed with a lower power will get similar results. If you are not sure if the laser is cutting all the way though wood or other non-transparent material, look for the reflection in the bottom of the chamber. You will see the bright white of the cutting if it is all the way through.
CamBam and Mach3 Configuration Files
Both CamBam and Mach3 require configuration files to work properly with the laser cutter. CamBam uses these configuration files to properly generate gcode designed for the laser cutter. Mach3 uses a configuration file to configure the controls to match the lasers motors, limit switches, power controls, etc. If the configuration files need to be reinstalled, the master copies can be found on github.com
Remaining Tasks
- Rear electrical cover plate
- Acquire CO2 or other non-destructive fire extinguisher
- Install Z+ limit switch
- Build and test PWM controller


