PCB Etching Workshop: Difference between revisions
Jump to navigation
Jump to search
Ranthalion (talk | contribs) No edit summary |
Ranthalion (talk | contribs) No edit summary |
||
| Line 20: | Line 20: | ||
# Soak copper and transfer in water for a couple of minutes, then peel off the transfer. | # Soak copper and transfer in water for a couple of minutes, then peel off the transfer. | ||
# Use 2 sandwich bags and etch the board with ferric chloride | # Use 2 sandwich bags and etch the board with ferric chloride | ||
# Drill the holes using drill press or dremel press. | # Drill the holes using drill press or dremel press. (Find the right bits and make sure it works with dremel and drill press) | ||
# Solder, Test, and Done! | # Solder, Test, and Done! | ||
Revision as of 20:38, 6 March 2016
Preparing for the Workshop
- Make sure you've run through the workshop before the day of the workshop. There are many aspects
- This workshop is maximum of 8 people. If you only have 1 printer and/or 1 laminator consider reducing class to a size of 6.
Topics
- Overview of the process including alternatives
- Copper clad variations and acid options (including disposal)
- Transfer sheet and transfer method options
- Hands on making!
Steps
- Print design on paper and mock the board layout to make sure the print is scaled correctly and the mirroring is correct.
- Cut transfer paper about an inch oversized and tape it to the original print. Print again on the glossy side of the paper.
- Cut copper clad to approximate size - about an inch over sized again.
- Using painters tape, tape 1 or 2 edges of the transfer to the copper.
- Run through the laminator 5 - 10 times (until you're tired of doing it)
- Soak copper and transfer in water for a couple of minutes, then peel off the transfer.
- Use 2 sandwich bags and etch the board with ferric chloride
- Drill the holes using drill press or dremel press. (Find the right bits and make sure it works with dremel and drill press)
- Solder, Test, and Done!
PCB Equipment Needed for Space
Here's a link to the equipment at hackrva for PCB etch: PCB_Making_Equipment
Here's a link to a supply list for this workshop: https://docs.google.com/spreadsheets/d/13CzrknA-gje8imDsIwGcc6N7ohlUdvaHhMr8B-QhfR0/edit#gid=0
Example Projects for Teaching
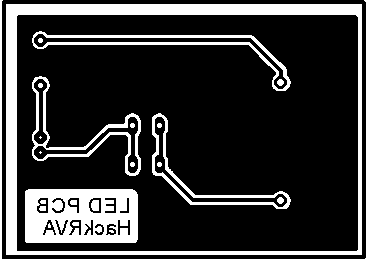
PCB Workshop Blinky 1
This is a simple LED board at about 2"x3" inches.
Parts List
- (1) Button
- (1) Battery Holder
- (1) Resistor
- (1) LED
